I made this card for the Simon Says Stamp Wednesday Challenge. There theme this week is "Tags" featuring Tim Holtz. I wanted to make a Christmas card using Tim Holz, but I don't have any Christmas stamps by them, so I improvised. The stammp I used might just look familiar to you. It's the Party Hat Sketch stamp! I just colored it green and red using my Zig Clean Color Markers, and turned it into a Christmas tree!! For the tag, I used some Kraft tags I bought at Michael's and distressed the edges with some Peeled Paint Distress Ink. I speckled some snow in using white gouache and then used some white pearlescent paste through the Simon Says Stamp Falling Snow stencil for larger snow. For the snowbank, I used some Glass Bead medium from Golden, mixed with some white acrylic paint, which I then topped with glitter. The glass beads give it an amazing texture.
The background paper is old stock from Close to My Heart, which I cut using the Stitched Rectangle Dies from Your Next Stamp. The sentiment was actually a Rub-On that I got from the Dollarama last year that matched perfectly! Then I just mounted everything to a green cardstock base from Michael's. I added a gold star and some twine for the finishing touches. Done!
So I'm taking a break from studying to post a quick and easy Christmas project that's also cheap to make. This project was inspired by Maureen on the Your Next Stamp Blog. All you need are those little red plastic shot glasses (like the mini Red Solo Cups), some paper, and some stickers (or stamps). And of course, you'll need some small goodies to stick inside, like Hershey's Kisses.
Simply die cut a circle from pattern paper that fits the top of your cup. I used the circle die set from Little B. Then, decorate the top of the circle however you want (I used Simon Says Stamp Gnome for the Holidays stamp set on some, and stickers on others), stuff the cup with your goodies, and glue the paper circle over the top of the cup to seal everything in! All done!
I want to enter this project into the Simon Says Stamp Monday Blog Challenge: Holly Jolly Stamping
I'm supposed to be writing a 3000 word essay that's due tomorrow, but I wanted to get this card done for the YNS challenge over on their blog. I'm soooooooo close to graduating that I can almost taste it! This one last paper, and then one more test and I am DONE!! Woo-hoo!!
Anyway, here's the card for this challenge. I used a Michael's card base with some Close to My Heart paper and some white cardstock. Then I used the scientist from the Perfect Chemistry set, but wanted to make him into a Christmas stamp and so took the hat from one of the caroling bunnies in the Sprinkles - Spreading Christmas Cheer set. I finished it off with a sentiment from CtMH. I'm pretty happy with the way it came out.
Also!! I have some great news to share with you too! In the last YNS challenge, they chose me as their top pick!! I'm so happy!
I don't make pocket letters very often because they take me soooooooooo
long to make. I wanted to make something different for Simon Says
Stamp's Monday Challenge Blog's "Gentlemen Challenge", so I made a pocket
letter in honor of the Man of December himself, Santa Claus! You can catch my video on YouTube if you wanna see what I used, but here's a picture of it:
Hey guys! Today I want to show you the card I made for the Simon Says Stamp Monday Challenge Blog Thanks/Thanksgiving Challenge. Whew, that's a tongue twister, isn't it? To make this card, I used some Michael's cardstock for the base, and some 140lb watercolor paper for the ink smooshing (see Kristina Werner for how to do that technique). I stamped a sketchy heart from Tim Holtz' Heartfelt Visual Artistry collection in Versamark, and then embossed it in white.
I then used Your Next Stamp's Thanks die on black cardstock, which I mounted on fun foam (cut from the same die) and adhered it to the front of the ink smooshed panel. I think mounted the panel onto some paper from my stash. Both the smooshed panel and the layer behind it were cut using Your Next Stamp's stitched rectangle dies. I finished the card off with some CtMH enamel dots and some Wink of Stella, which I used on the thanks die cut. You can see the sparkle more in the close up picture below:
So I've been hammering out some solid hours on Fallout 4 and decided I needed a little break for some crafting time (and also because I think my eyes were really about to fall out from all that strain). I used some really awesome products from Your Next Stamp to make this very interactive card, including their Front Door Die Set and Sprinkles - Spreading Christmas Cheer Stamp set with matching dies. The patterned papers are from my stash, and the cardstock is Recollections from Michael's.
I'm entering this card into the Your Next Stamp blog challenge. This week, I used both the color AND the sketch challenge, with some definite modifications to the sketch. That was mostly to make room for the spring to fit nicely so that the bunny would pop out when the door was opened. The spring I used is from Close to My Heart, and is really a little too strong to be behind the door. It kept popping the door out! I had to use some velcro to keep the door closed! I finished the front of the card with the die cut wreath and bow from the door die set, using Copic markers to give depth to the cuts. The bunny was also colored with Copics (yeah... I see now why everyone loves them...).
Now if you'll excuse me, I need to go spend some more time in the Commonwealth blowing up some more Super Mutants and ghouls...
I hadn't actually planned on making this; I had just bought Fallout 4 and had intended to play it all night until I realized when I stuck it into my Xbox One that it had to install first. After I shed a few tears (I joke!! Mostly...), I decided to throw a little something together while I waited. Inspired by the challenge at Simon Says Stamp's Monday Challenge blog, I grabbed my Little B Stitched Star dies and cut a frame for the front of the shaker as well as the background star. My plan was to make something that represented the North Star.
Once I cut the stars out, I used Chipped Sapphire and Mermaid Lagoon Distress Ink to color the background, to which I added stars using white watercolor paint. I also cut hills using Simon Says Stamp's Stitched Hills dies and a house and trees using their Village die. I used foam tape to make room to add some white seed beads and some sequins. My first thought had actually been to turn this into a card, but I actually liked the star shape and thought it made an excellent ornament, so I grabbed some white and blue twine and threaded it through the star using a needle. I love how it turned out!
Sometimes (ok, lots of times) I struggle when trying to make a card. I have an idea in my head of what I want to use on a card, but not always a clear direction on where to go with those elements. This card was one of those. I was making a card for this weeks challenge at the Simon Says Stamp Wednesday Challenge Blog, and I thought that I would like to include the Tulip die from Susan's Garden by Sizzix. Of course, I wanted it to look more like a poppy, so I had to fiddle around with it a bit. In the end, the card ended up taking me 3 hours or so, with most of that time being me stading around scratching my head!!
I started with a white scalloped card base that I got as a freebie from one of those UK crafting magazines. I repeated stamped Thank You in a diagonal using Close to My Heart's Champagne ink to for the background. The papers that I used were from my stash, some old K & Company, I believe. I think it's important that we continue to use our old papers even if they might no be super trendy anymore. Let's find a way to make those papers work!
I knew one thing that was important for me was that the card have a focal point. That's why I chose to have the large pierced circle on the card. It draws your eye right to the poppy. To make the poppy stand out even more, I inked the edges of the petals in Cranberry ink from CtMH, and did the same on the leaves with Topiary. I finished the card off with a large bold Thanks stamp from CtMH in Cranberry ink, with a brad beside it.
Despite how long the card took to make, I'm really happy with the result!
I made this card for the challenge at Simon Says Stamp's Monday Challenge Blog. I used the Furry Christmas stamp set from Simon Says Stamp, which I colored using ZIG Clean Color Real Brush markers on 140lb watercolor paper. I messed up initially when I colored the cat, so I just stamped him again, recolored him, and fussy cut him out. Then I glued him to the front of the image, which gave him a bit of dimension, too.
The backgound paper is a Michael's Recollection on e that I had in my stash. I backed the image with some red cardstock, and placed a piece of vellum (which I colored green with alcohol markers) behind it. This vellum was cut using Mama Elephant's Peek a Frame dies. I also used the same die to cut the background paper and the panel with the colored image.
It doesn't show very well in the picture, but I used Glossy Accents on the noses of the dos and cat, as well as the antlers and scarf. For the sentiment on my card, I decided to perform some stamp surgery, and cut the "love" part from the Joy and Love sentiment, and added the "Peace" stamp instead. I put dots of white gel pen on the eyes to make the card pop, and that's my finished card!
Hey there fellow crafters! Today, I want to share a really easy, super cute shaker card with you. These cards can be assembled in minutes, especially once you've got your stamp all picked out! These cards are great for mass production, because you're just cutting your cardstock and the gluing everything together. One little trick is going to make them a super easy treat to make!
Supply List:
Colored 8 1/2 x 11 inch cardstock.
White cardstock.
Glitter tape/Ribbon
SHAKER STICKERS!! (We're cheating, I know! I got mine from Dollarama.)
First, you need to cut your card base. I used Michael's Recollection 8 1/2 x 11 inch cardstock in blue for my snowman card, and green for my Christmas tree card. Cut the cardstock in half lengthwise so that you end up with two pieces of cardstock that are 4 1/4 x 11 inches long. Fold these in half to create a top folding card.
Next, you need a piece of white cardstock that's 4 1/8 x 4 7/8 (you can change the measurement depending on how much white you want). Now, determine where you want your shaker to be. Lightly place the sticker to determine placement, and then use a light pencil stroke to remember where. Once you've done this, it's time to stamp your sentiment! Then, place the shaker sticker back and press it firmly onto the paper. Then, use a glitter or metallic pen to draw a border around the outer edges of the white cardstock.
Place your glitter tape/ribbon so that the bottom of the tape is just over a quarter of an inch from the bottom, or to your liking. Now, mount the card on fun foam (or use foam tape), and stick the panel above the glitter tape. There! You're all done your simple shaker card!
I'd also like to enter the snowman shaker card in the folowing challenges:
Simon Says Stamp Wednesday Blog Challenge: Anything Goes
That's no typo in my title! This sweet (no, wait, SALTY) card was inspired by the Your Next Stamp blog challenge. I used their sketch as my inspiration, but as you can see, I put the smaller rectangle behind my front panel instead of in front. I was also inspired by the color part of their challenge, but I don't think I used all of them in this card.
I used YNS's Soy Awesome stamp set for both the image and the sentiment,
while the papers are from last year's Close to My Heart. I colored the
image with my Prismacolor pencils, and blended with mineral spirits. If you haven't tried coloring with these pencils yet, give them a try! You can get some really great blending! The background was done by sponging Hero Arts Unicorn ink through the
Reversed Chicken Wire stencil by The Crafter's Workshop. It gives a
really subtle effect, which was perfect for this card! I kept the card
simple, and finished it off with a bit of Glossy Accents for the eyes.
You can play along with the challenge on the YNS blog.
There is a throw-back challenge this week on the Simon Says Stamp Monday Challenge Blog. I've chosen to go with the January 2014 Blues Challenge.
For this adorable mini card, I used the Jar Stamp and Die set by Stephanie Barnard from Sizzix. I cut the jar twice on Michael's 120lb cardstock. I then used Distress inks to color the front of the card, with Peacock Feathers on the bottom, Blueprint Sketch in the middle, and Chipped Sapphire at the top. I sprinkled some water droplets on the card for some texture, and then I used some Sakura Koi white watercolor and flicked little speck on to create the snow.
I die cut the hills from Simon Says Stamp's Stitched Slopes and Hills, and then die cut the hills using the jar die again so that they fit perfectly onto my card. I also used Simon Says Stamp Village Dies to cut out the houses and trees. I attached the houses and trees to the hills and then adhered the hills to the card front using foam tape to give them some dimension. Finally, I used Close to My Heart's Bright Spirits stamp set to add the sentiment in Pacifica ink.
Yesterday, I got my Stamp of Approval Holiday Box from Catherine Pooler! I was so excited when she announced this box and I knew that I had to have it! It comes with 5 (yes, you read that right 5!!) great stamps sets, and 3 sets of beautiful coordinating dies! I was so excited that I had to make 2 cards right away.
I love the versatility of these stamp sets; they come with an assortment of stamps including sentiments, snowflakes, a Christmas tree and baubles, and borders! To see the stamps included in the set, check out my video below:
I made two cards from the box, one in traditional Christmas and one in non-traditional colors. For the one in traditional Christmas, I used the Holiday Flourishes set from The Ton. Using Close to My Heart's (CtMH) Sweet Leaf and Topiary inks for the holly leaves, and Cranberry ink for the berries, I stamped a wreath shape on the top part of the card. I also used the candy cane border stamp from the Winnie and Walter Holiday Trimmings set, which I stamped onto the card base in Cranberry. I die cut the Happy Holidays from Neat and Tangled from gold foil and adhered it under the wreath using a glue pen. I popped up the front panel using fun foam, and that was it! Pretty simple, huh?
For the non=traditional card, I used the tree border from the Holiday Trimmings set, which I stamped repeatedly onto a 4 1/4 by 5 1/2 white cardstock panel using CtMH's Pixie, Glacier, and Sweet Leaf inks. I then cut another white panel which was 2 1/2 by 5 1/2, and stamped the awesome tree from the Bright Baubles set. The sentiment is from the same set, embossed using Simon Says Stamps gold. I used the Little Bits dies to die cut the baubles and then stamped them using the same ink colors. The little bauble stamps in this set are gorgeous! I then stuck the baubles onto the tree. I mounted the white panel onto a 2 3/4 by 5 1/2 aqua cardstock panel, which I stuck on to the card, offset to the right. I love the way this one came out!
So there you have it. I absolutely adore Catherine's Stamp of Approval box, and definitely intend to get the next one that comes out, which I beleive is in January. If you want the next box, don't forget to sign up to the wait list!
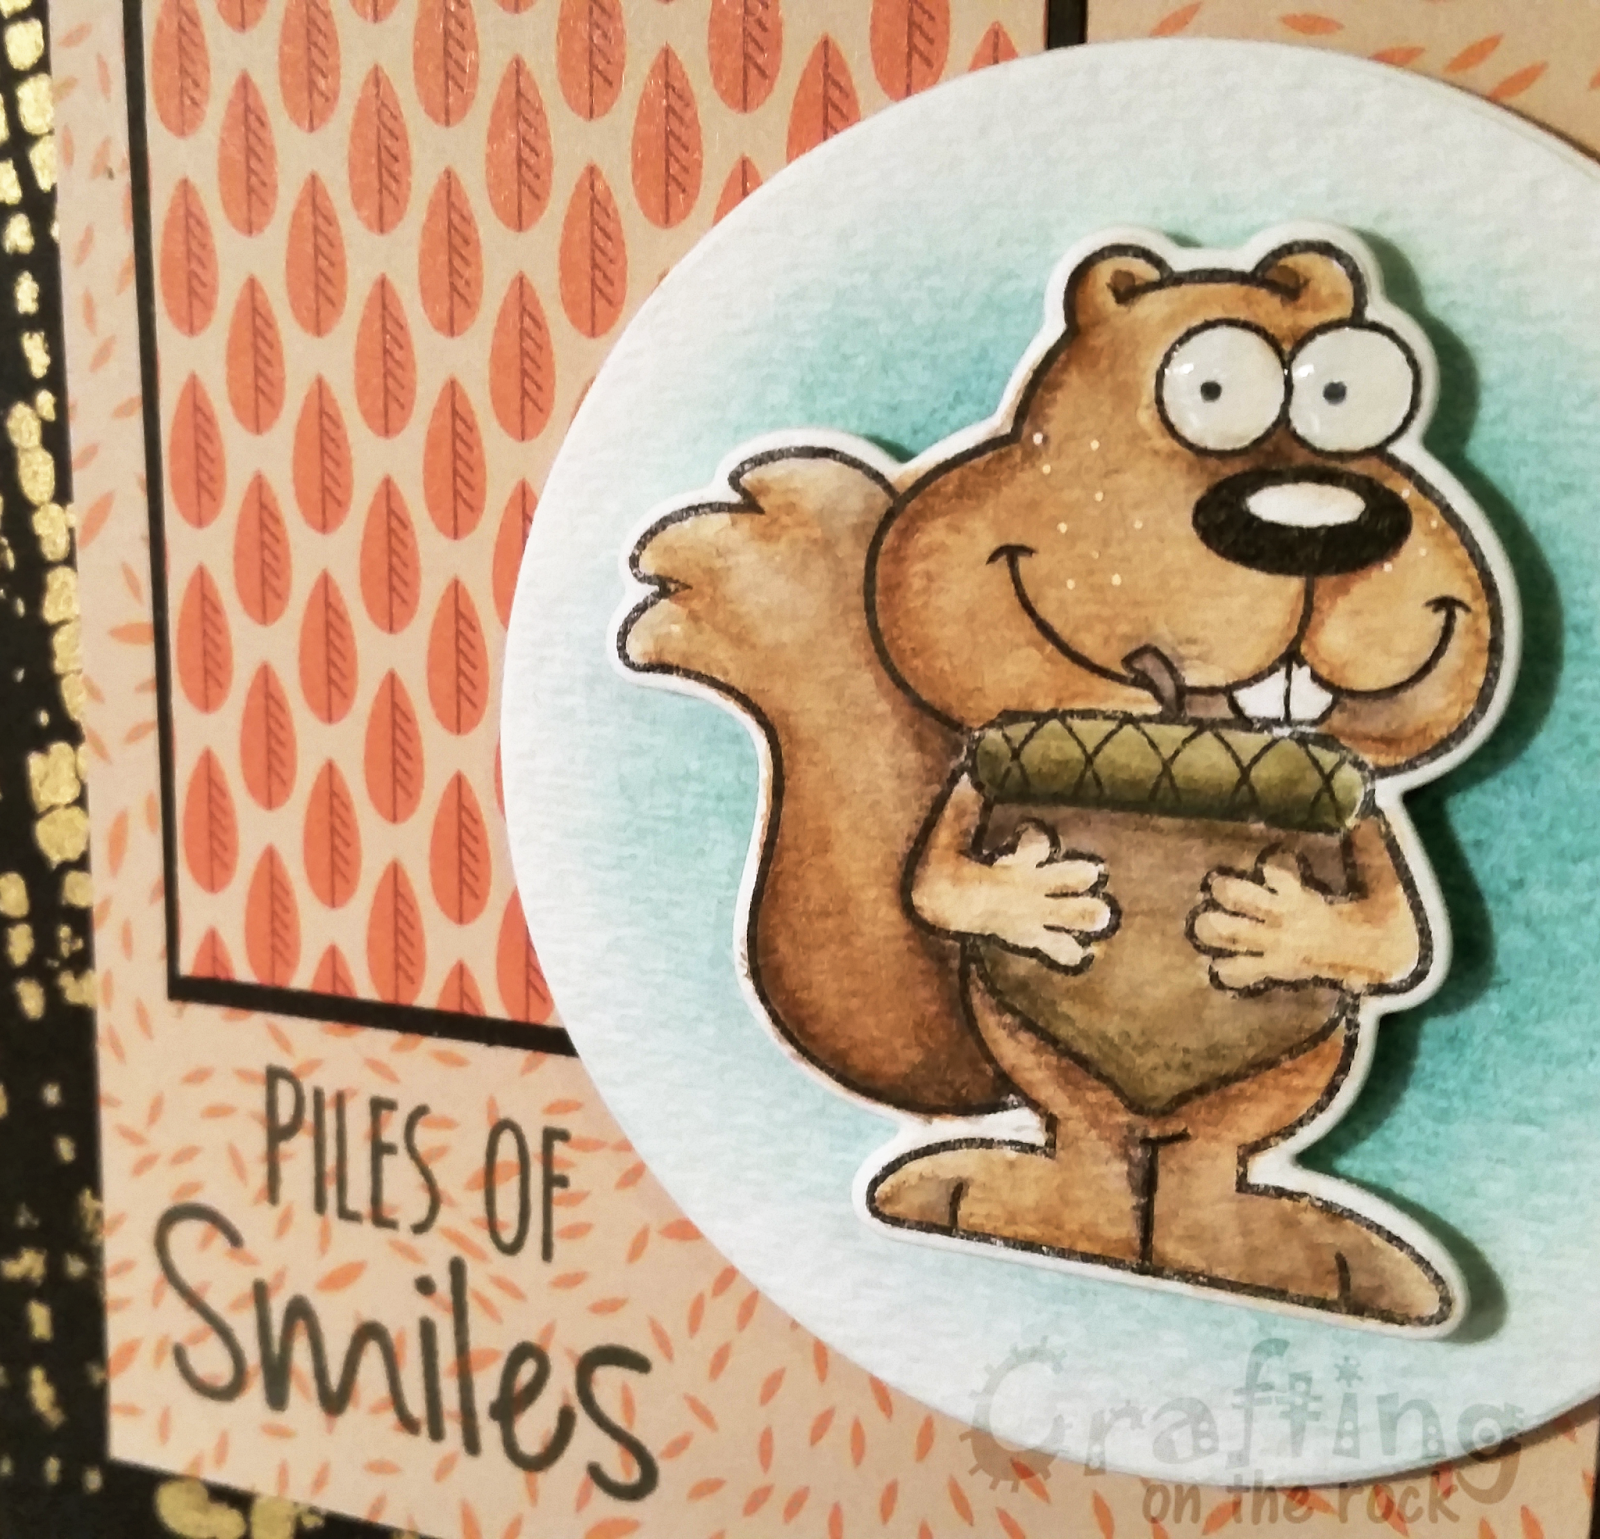
I made this card for the Your Next Stamp (YNS) Sketch and Color Challenge #25. I really loved the colors for this challenge, and I thought that I would also incorporate the sketch as well. I did change the sketch up a bit, but I think it retains the essence of it.
I used black Recollections card stock from Michael's as the base, and added Lumiere gold arylic paint through The Crafters Workshop Mini Tile Texture stencil. I used last year's Close to My Heart Pathfinder paper collection for the basic shapes, and Strathmore watercolor paper for the circle and the stamped image.
I added a bit of blue to the circle so that the orange colors on the card would really pop. The stamped image (and the sentiment) are from YNS's Piles of Smiles stamp set, and I cut the squirrel using the coordinating die. I colored the squirrel using my Derwent Inktense Pencils.
I adhered the circle and the squirrel using mounting foam squares from the dollar store, and then trimmed off the portion of the circle that stuck out over the card. I finished the card by putting a few dots of white on the Squirrels cheeks, and some glossy accents on the eyes. I'm really happy with the way this card turned out! Check out Your Next Stamp's challenge here.
I loved the colors in the latest sketch and color challenge on the You Next Stamp blog. Of course, I ended up having a few challenges while making this card; I was over halfway through the card when I dropped my black inkpad on the fron of my card and had to start over! I'm really pleased with how this came out though, so the little setback was ok!
For this card, I used Michael's cardstock, the gear stencil from The Crafters Workshop, YNS's Perfect Chemistry stamp set, Close to My Heart's (CtMH) Dizzy Circles and Birthday Funnies. I used CtMH's Indian Corn Blue ink to ink the stencil on by card base, then covered it in a second piece of cardstock in the same color as the base, with the edges inked with blue. I used a hero arts background stamp on top of purple cardstock, and then cut a circle in it to make a shaker card. To make the shaker, I used one section of a nine pocket page protector and sealed it closed with the Photo Fuse tool. I attached the shaker to the underneath of the purple cardstock using my ATG gun, and put a circle frame in white above the cardstock.
I colored the mad scientist from Perfect Chemistry with an assortment of alcohol markers, fussy cut him out, and stuck him over the shaker hole. I covered his eyes with Glossy Accents (but... after I took the photo lol). I then mounted the entire front panel to the cad base using foam tape. I finished the card off by stamping a sentiment from the Stamps of Life Tic Tac Toe set onto white card stack, put a little CtMH silver shimmer trim under it, and stamped my greeting on the inside.
If you get a chance, check out Your Next Stamp's amazing blog challenges! They help you get back on your crafty feet when inspiration lacks!
Well, I had made this card for the Your Next Stamp (YNS) Color and
Sketch Challenge #14, but I forgot to enter it in time. I thought I'd
go ahead and post it here anyway. I used colored cardstock from
Michael's, as well as some punched butterflies that I had received from a
friend, some felt flower ribbon, some glitter tape, and some sparkly
enamel dots from YNS. The sentiment stamp was also from YNS. I
followed both the sketch AND the color requirements for this.
This card was made for a challenge for the Sketch and Color Challenge #13 on the Your Next Stamp blog. I chose to do the sketch challenge. This is a top fold card made using the Perfect Chemistry stamp set from Your Next Stamp, which I colored with Prismacolor pencils and mineral spirits.
The papers I used were all Recollection brand cardstock from Michaels; I just poked through my scrap folder until I found pieces that were a good match with each other. The sequins were from the dollar store. I finished the card by putting clear Wink of Stella on the light bulb, and Glossy Accents on the eyes, shine spots, and metal bottom of the light bulb. Here's a close up so that you can see the Wink of Stella and Glossy Accents.


