Showing posts with label YNS. Show all posts

Monday, 5 September 2016

Celebrate with Zig Clean Color Real Brush Coloring

I made this for the Sketch and Color Challenge #47 at Your Next Stamp.  I tried to follow both the sketch and color challenge.  I used some paper from my stash (mostly Simple Stories, I think) and then stamped the drummer from the YNS Silly Monster Rockstars, and the sentiment from the YNS Journal Words.


I colored the image using my Zig Clean Color Real Brushes so that it matched the color scheme of the challenge.  I mounted the colored panel on fun foam and adhered it to my card, made of 110lb white card stock, and then added a few star confetti as embellishments.


Challenges


I'm entering this in the following challenges:

Simon Says Stamp Monday Chellenge: Stamp it
Simon Says Stamp Wednesday Challenge: Anything Goes
Your Next Stamp challenge: Sketch and Color Challenge #47

Materials Used (some affiliate links included):


Silly Monster Rockstars
Journal Words
Zig Clean Color Real Brushes: Canadian Amazon; American Amazon
Neenah 110lb Solar White Cardstock: Canadian Amazon; American Amazon
Fiskar Paper Trimmer: Canadian Amazon; American Amazon
Multi Matte Medium: Canadian Amazon; America Amazon

Wednesday, 31 August 2016

Simple Rainbow Thanks

So, one of my favorite stamp companies, Your Next Stamp, is hosting the challenge this week over at CASology, so I decided I had to participate.  Also, it means that now I have one more challenge that I can enter weekly to inspire me to make cards.  This week's "Cue Card" was "stitch".  For this challenge, I stamped a panel using Your Next Stamp's Stripes and Stitching in rainbow colors, and then die cut the panel using Your Next Stamp's Stitched Rectangles, which I popped up with fun foam.


 I also used Your Next Stamp's Fancy Thanks die, which I cut three times and glued together to create a thicker sentiment.  I wanted even more dimension and some shine on that, so I added glossy accents.  I finished the card with a few self adhesive sequins, just to give it a little pop.  I'm not if this is what a clean and simple card should look like, but I think maybe it fits the bill.  One thing I didn't like about this card was that it ate up the last of my Tombow Mono Multi adhesive.  Now I need to go buy more...  *sigh*

Sunday, 21 August 2016

One Layer Cards

I don't know why it is, but I rarely seem to do one layer cards.  I think part of it is that I was always afraid that the color would bleed through to the inside of the card, but it seems to be okay as long as I don't use Copics.

With that in mind, today I thought I'd pop outside my comfort zone and make a few one layer cards.  The best thing is that they didn't take me long at all.  Fair warning: one of these is a CHRISTMAS card!!  I know, right?  It's not even September yet, but there you go.


Card #1 - Stamp of Approval


I used one of the butterflies from the Butterfly Notes set and stamped them in rainbow color across the middle of a top-fold landscape card.  I used the "Thanks" and "a Note to Say" sentiment from the same set and Voila!  All done!


Card #2: Your Next Stamp


For this card, I folowed the above , but instead of a butterfly, I used my Thumb.  Then I stamped one of the faces from YNS's Create a Character stamp set.  I used the same sentiment from the SOA Butterfly Notes set.  I didn't bother to color the eyes white, but you totally could.


Card #3:  Stamp of Approval


And now the Christmas card!  This one was done using the Wonderful Wreath set.  I stamped the wreath three times, once in CtMH Champagne, then in Pear, and then Topiary.  Basically, beige, then light green then dark green.  I stamped some pine cones in brown and the berries and the ribbon in red.  I wanted something to make in sparkle, so I dragged something from my stash that I hadn't used in a long time:  Stickles!  I coated everything that was red in Christmas Red Stickles.  And that finished my card!


Saturday, 20 August 2016

YNS and SOA

I've got two more cards to share with you today, one using goodies I recently got from Your NExt Stamp, and one using goodies from Catherine Pooler's Stamp of Approval.

Your Next Stamp


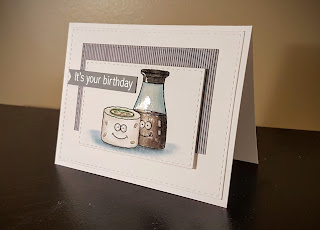
I made this card for the Sketch and Color Challenge #46 up at Your Next Stamp.  I used two sets that co-ordinate very well with each other, Maki a Wish and Soy Awesome.  I followed the sketch of the challenge (but switched up the placement of a few elements), and colored my images using my Prismacolor pencils.  I used a bit of random paper from my stash (I feel like I'll never need to buy paper again, my stash is THAT out of control).  I white embossed the sentiment onto grey card stock and added a little fishtail.  I attached everything with fun foam to add dimension.  Finally, I finished the card by coating the soy bottle in a think coat of Glossy Accents.


Stamp of Approval


I used the Butterfly Notes and the Lovely Flowers stamp sets from the Lovely Notes Stamp of Approval collection for this card.  I simply stamped a background of various thank you sentiments using Close to my Heart inks onto white paper. I then stamped 3 butterflies (using two tones of ink to give some dimension) onto white card stock and fussy-cut them out.  Can I just stop a minute here to say how much I despise fussy-cutting??  Yeah.  Moving on.

I stamped the main Thank You sentiment from the same collection and them mounted everything thing using fun foam, and the butterflies were mounted so that their wings are higher than their bodies.  The gold shiny strip along the side in metallic washi tape from the Dollarama.  I finished off the card with a few enamel dots.  Does anyone other than me always have trouble finding the right places to put enamel dots and sequins?  I love them when other people use them, but I just can't get them to work right...

Challenges:


Sketch and Color Challenge #46